Before You Start
What You'll Need
- Administrative access to the EasyLlama dashboard
- Administrative access to Entra ID (Microsoft Azure) portal
- Your EasyLlama Company ID (found in SCIM endpoint URL)
- Understanding of your organization's user attributes and mappings
- Test user accounts for validation
Quick Reference
- SCIM Tenant URL:
https://api.easyllama.com/scim/v2/[YOUR_COMPANY_ID] - Authentication: Bearer token (generated in EasyLlama)
- Supported features: Create, Update, Delete users
- Groups: Disabled by default (can be enabled if needed)
Configure SCIM Provisioning
Step 1: Generate SCIM Access Token in EasyLlama
- Log in to the EasyLlama dashboard.
- From the left navigation menu, click Settings > Integrations.
- If you have not set up the API integration, please follow these steps before proceeding: API Integration
- Click the API tile, then click the three dots (⋮).
- Select Access Tokens.
- From the top right corner, click Create Access Token.
- Copy and save the generated token securely—this is the Secret Token and will not be shown again.
Step 2: Note the SCIM Tenant URL
The SCIM Tenant URL is:
https://api.easyllama.com/scim/v2/[YOUR_COMPANY_ID]
Find your Company ID:
- From your EasyLlama dashboard, go to Settings > Integrations > API tile
- The Company ID is the number at the end of the SCIM endpoint shown
- Example: If URL shows
https://api.easyllama.com/scim/v2/23456, the Company ID is23456
Step 3: Create an Enterprise Application in Entra ID
- Log in to the Entra ID (Microsoft Azure) portal.
- Navigate to Enterprise applications > New application.
- Select Create your own application.
- Enter a name for the app (e.g., "EasyLlama SCIM Integration").
- Choose Integrate any other application you don't find in the gallery (Non-gallery).
- Click Create.

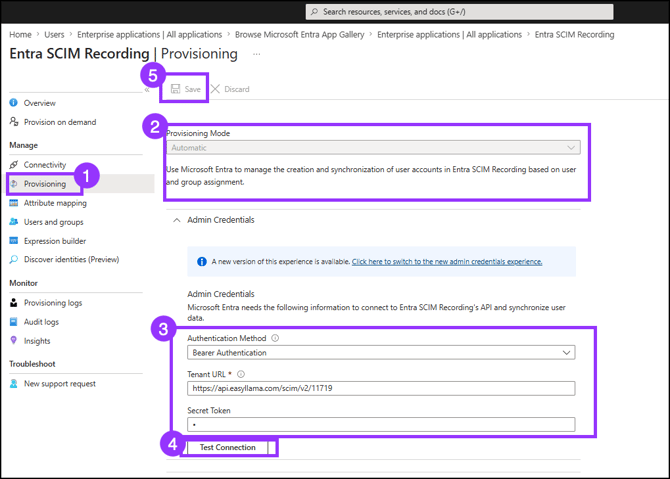
Step 4: Configure Provisioning
-
In the new enterprise application, from the left menu, select Provisioning.
-
Set Provisioning Mode to Automatic.
-
Enter connection details:
- Tenant URL: The SCIM Tenant URL from Step 2
- Authentication Method: Bearer Token
- Secret Token: The access token you generated in Step
-
Click Test Connection.
- You should see a green check mark in the upper right corner, confirming a successful connection.

-
Store the connection settings by clicking Save.
Step 5: Configure Attribute Mappings
Disable Group Provisioning
Group provisioning is not currently supported.
- Expand the Mappings field.
- Click on Provision Microsoft Entra ID Groups.
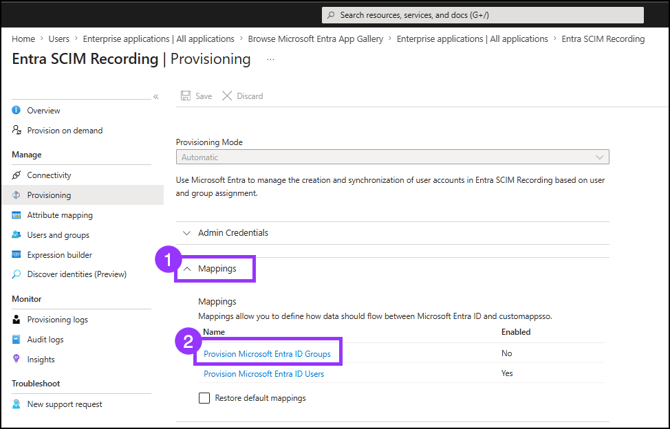
- Set Enabled to No.
- Click Save.
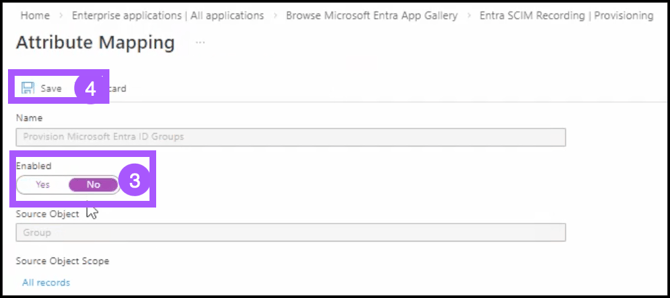
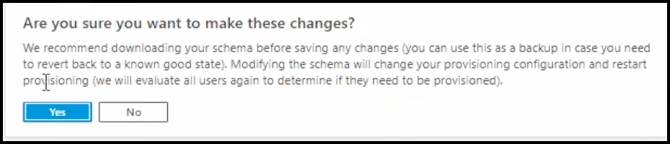
- Verify the changes by clicking Yes. A green check mark appears in the upper right corner, confirming the action.

- Once back on the Provisioning page, refresh the screen to see changes take effect.
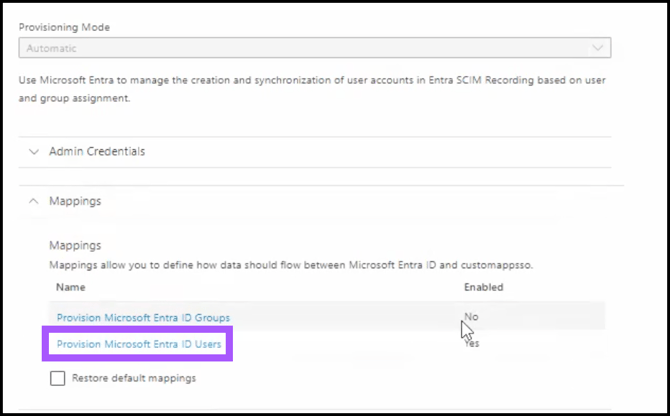
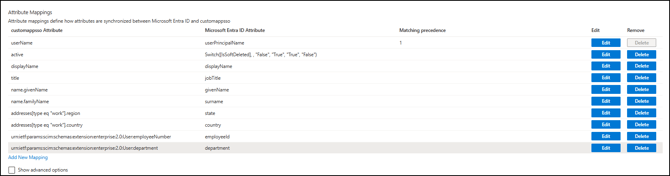
Configure User Attribute Mappings
- Expand Mappings, and click Provision Microsoft Entra ID Users.
- On the Attribute Mappings screen, under Target Object Actions, ensure Create, Update, and Delete actions are checked.
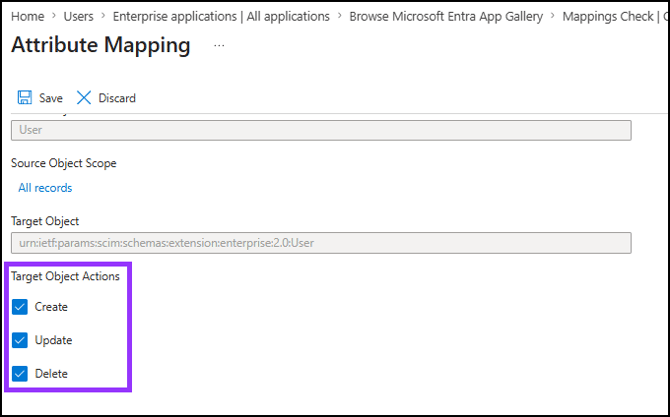
- Remove the default mappings that are not supported by clicking the Delete button. (see below for the list to keep.)
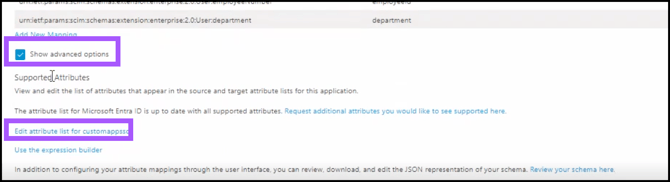
Create Custom Extension Attributes
Create the custom SCIM attributes for EasyLlama-specific fields:
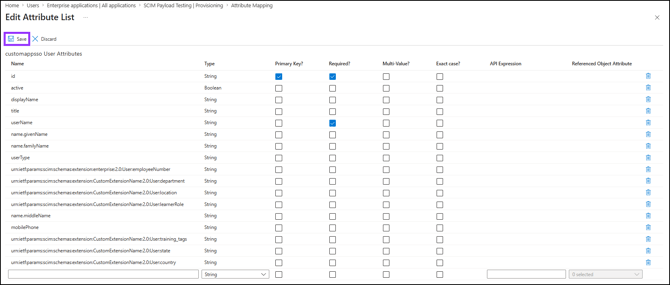
- Click Show advanced options > Edit attribute list for customappsso.
- Remove the User Attributes that are not needed by clicking the Trash Can icon.
- Scroll to the bottom to add custom attributes, such as:
| Name | Type |
|---|---|
urn:ietf:params:scim:schemas:extension:enterprise:2.0:User:employeeNumber |
String |
urn:ietf:params:scim:schemas:extension:enterprise:2.0:User:department OR urn:ietf:params:scim:schemas:extension:CustomExtensionName:2.0:User:department |
String |
urn:ietf:params:scim:schemas:extension:CustomExtensionName:2.0:User:location |
String |
urn:ietf:params:scim:schemas:extension:CustomExtensionName:2.0:User:learnerRole |
String |
name.middleName |
String |
mobilePhone |
String |
urn:ietf:params:scim:schemas:extension:CustomExtensionName:2.0:User:training_tags |
String |
urn:ietf:params:scim:schemas:extension:CustomExtensionName:2.0:User:state |
String |
urn:ietf:params:scim:schemas:extension:CustomExtensionName:2.0:User:country |
String |
5. Verify you’d like to make the changes by clicking Yes.
Add New Mapping
- Back on the Attributes Mapping screen, click Add New Mapping.

Add Active Mapping
- Edit the Attribute for active in the following way:
- For Mapping type, choose Expression
- For Expression Value, enter this: Not([IsSoftDeleted])
- For Target Attribute, select active
- When finished, click OK.
Add User Type
- Edit the Attribute for User Type in the following way:
- For Mapping type, choose Constant,** or the option that best fits your use case.
- For Constant Value, use learner, or what best fits your use case.
- For Target Attribute, select userType
- When finished, click OK.
Add Location Mapping
- Edit the Attribute for Location in the following way:
- For Mapping type, choose Constant or the option that best fits your use case.
- For Constant Value, use “Location from SCIM” or what best fits your use case.
- For Target Attribute, select
urn:ietf:params:scim:schemas:extension:CustomExtensionName:2.0:User:location.
- Click OK.
Add Learner Role Mapping
- Edit the Attribute for Learner in the following way:
- For Mapping type, choose Constant or the option that best fits your use case.
- For Constant Value, use “non-supervisor” or what best fits your use case.
- For Target Attribute, select
urn:ietf:params:scim:schemas:extension:CustomExtensionName:2.0:User:learnerRole.
- Click OK.
Add Middle Name
- Edit the Attribute for Learner in the following way:
- For Mapping type, choose Constant or the option that best fits your use case.
- For Constant Value, use “Middle Name from SCIM” or another value that best fits your use case.
- For Target Attribute, select
name.middleName.
- Click OK.
Add Mobile Phone
- Edit the Attribute for Mobile Phone in the following way:
- For Mapping type, choose Constant or the option that best fits your use case.
- For Constant Value, use “11111111111” or the value that best fits your use case.
- For Target Attribute, select
mobilePhone.
- Click OK.
Add Training Tags
- Edit the Attribute for Training Tags in the following way:
- For Mapping type, choose Constant or the option that best fits your use case.
- For Constant Value, use the Training tag (found in EasyLlama) or the option that best fits your use case.
- For Target Attribute, select
urn:ietf:params:scim:schemas:extension:CustomExtensionName:2.0:User:training_tags.
- Click OK.
Save Mappings
Once all mappings have been created, click Save, then click Yes to verify.
Step 6: Create a Test User [Optional]
NOTE: You can also use an existing user if you do not wish to create a Test User.
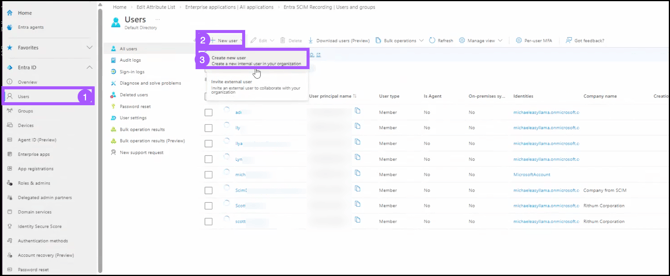
- From the left navigation menu, click Users.
- Click + New User.
- Click Create New User.
- Complete the Basic information as required, then click Next: Properties to proceed.
- Complete the Identity, Job Information, Contact Information, and Parental Controls as desired, and click Next: Assignments to proceed.
- If desired, create Assignments, and click Next: Review + Create to proceed.
- Click Create to finish creating the new test user.
Step 7: Add Assignments to Users to Test
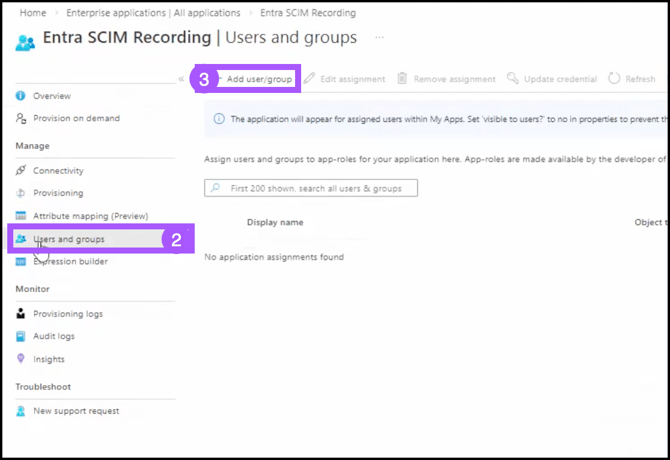
- Return to the Provisioning Page.
- Click Users and Groups
- Click + Add user/group.
- Under Users, click None Selected, and select a user.
- Click Select to confirm.
- Click Assign.
Step 8: Start Provisioning
NOTE: For more detailed information and instructions, please review Microsoft’s article on Provisioning on Demand.
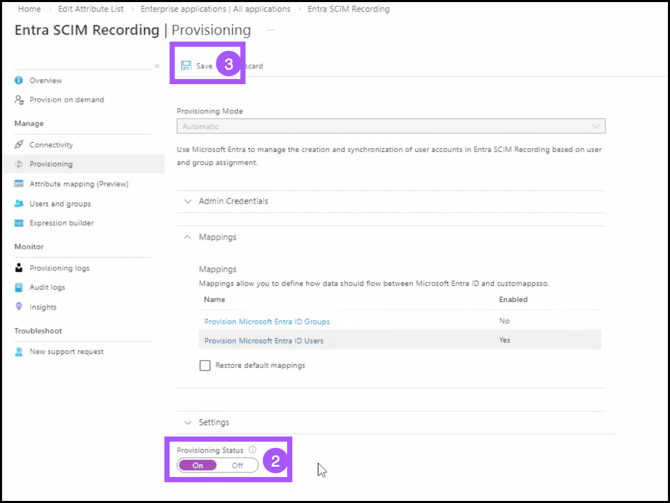
- Return to the Provisioning page.
- Set Provisioning Status to ON.
- Click Save.
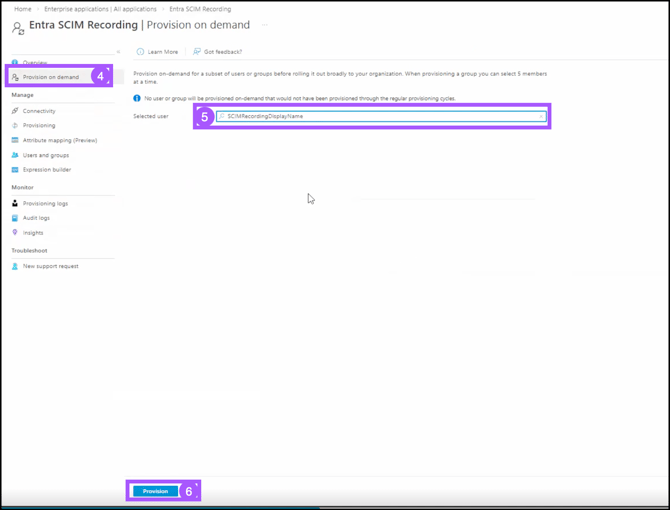
- To trigger the initial sync, click Provision on Demand.
- Type a user name into the text box, and select the user you’d like to test with.
- Click Provision.
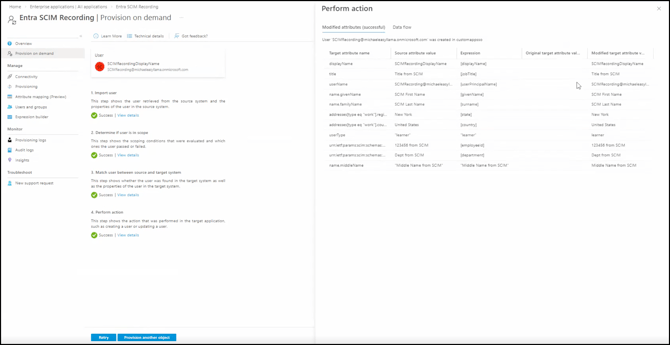
- You will see the following logs. Ensure the attributes are pulling from the user as expected. You can also navigate to EasyLlama to ensure the user data has been imported successfully.
Step 9: Monitor and Verify
- Monitor Provisioning logs in Entra ID for errors.
- Check the EasyLlama Learners tab for newly provisioned users.
- Verify that:
- Users are created with the correct attributes
- Updates are syncing properly
- Deleted users are deactivated in EasyLlama
Attribute Mapping Reference
| EasyLlama Field | SCIM Attribute | Notes |
|---|---|---|
| First Name | name.givenName |
Standard mapping |
| Last Name | name.familyName |
Standard mapping |
emails[type eq "work"].value |
Standard mapping | |
| Location | urn:ietf:params:scim:schemas:extension:enterprise:2.0:User:location OR urn:ietf:params:scim:schemas:extension:CustomExtensionName:2.0:User: |
Custom attribute |
| Role | urn:ietf:params:scim:schemas:extension:CustomExtensionName:2.0:User:learnerRole |
Custom attribute (values: supervisor/non-supervisor) |
| Training Tags | urn:ietf:params:scim:schemas:extension:CustomExtensionName:2.0:User:training_tags |
Custom attribute (values: Training Codes from EasyLlama) |
| State | urn:ietf:params:scim:schemas:extension:CustomExtensionName:2.0:User:state |
Custom attribute |
| Country | urn:ietf:params:scim:schemas:extension:CustomExtensionName:2.0:User:country |
Custom attribute |
Helpful Tips
Verify the Company ID in Tenant URL
Double-check your Company ID. Incorrect URL results in connection failures.
Save the Access Token once it’s generated
The token is only shown once. Save it securely immediately after generation.
Be sure to add custom attributes
EasyLlama’s Smart Assign requires state, country and role attributes. Standard SCIM attributes alone won't work.
Disable Group Provisioning
Group sync is not currently supported.
Quick Questions
What happens when I delete a user in Entra ID?
The user is deactivated in EasyLlama (not permanently deleted), preserving training history.
How often does provisioning sync?
Provisioning runs on a schedule you configure in Entra ID (typically every 40 minutes).
Why is my test connection failing?
Common causes include an incorrect Tenant URL, an expired/invalid access token, or network restrictions.
Llama Fact: Llamas are social animals that thrive in structured herds—similar to how SCIM provisioning creates structured, automated user management across your identity systems!