If the Authentication feature in Step 5 is not available in your dashboard, please reach out to support@easyllama.com to have it enabled.
Our SAML 2.0 integration will allow employees from your organization to log in to EasyLlama without using passwords.
We support the following roles:
- EasyLlama admin
- EasyLlama learner
Create an EasyLlama Entra app
- Go to your Azure account - Go to your Microsoft Entra account
- Create a new app - Click on Applications > New Application and create a new app. You can name it "EasyLlama SAML"
- Set up the app - In the left-side menu, click on Single Sign-on and select SAML
- In another tab, open your EasyLlama dashboard and go to Settings > Authentication > SAML
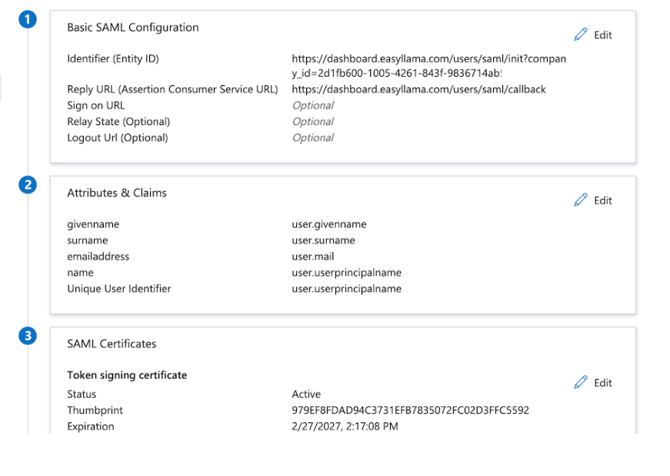
Enter the following:
- Basic SAML Configuration:
- Identifier: Can be found in your EasyLlama dashboard under Settings > Authentication > SAML
- Reply URL: https://dashboard.easyllama.com/users/saml/callback
- Attributes & Claims:
- Unique User Identifier: should be the user email
- userType: the role assigned to the user - can be "admin" or "learner" or both "admin,learner"
- training_tags: unique training codes that will be assigned after the first login
- ... and more - see the screenshot below
Add the SAML settings in EasyLlama
5. Add the SAML settings to your EasyLlama dashboard - Go to your EasyLlama dashboard and click Settings > Authentication > SAML Authentication Settings
Enter the following items:
- IdP Single Sign On URL: the Login URL generated by Entra
Example URL: https://login.microsoftonline.com/32c76031-d7ac-444a-9588-0e6d77a7e4c6/saml2 - Identity Provider Issuer: the Microsoft Entra Identifier
Example URL: https://sts.windows.net/32c76031-d7ac-444a-9588-0e6d77a7e4c6/ - User Login URL (optional): the User access URL in Microsoft Entra, in the Properties tab in the left toolbar
Example URL: https://launcher.myapps.microsoft.com/api/signin/b1f32934-a890-4738-9c90-fb337cd32499?tenantId=32c76031-d7ac-444a-9588-0e6d77a7e4c6
User Login URL is required for SAML with Microsoft Entra
- X.509 certificate: the Base64 certificate generated by Entra (.crt file)
- (Optional) Enable "Provision users automatically when they sign in". This will create the account in EasyLlama if a user does not already exist. Note, this is not recommended when using SCIM Provisioning, or any integration that already creates users, as having both can cause issues with user creation.
- Once you have entered all the required fields, click Save.
Congratulations, your SAML integration is now ready to be used!