Workday Integration is a one-way integration that will allow you to sync learners daily, auto-assign training, and send notifications. You may contact Support@easyllama.com if you are an existing client who would like to add this integration to your account.
This is an advanced integration and will require a knowledgeable administrator, within your organization, who can assist with the setup and maintenance of this integration.
To get started, please follow these steps:
Step One:
Log in to the Workday Tenant using an Administrator Account
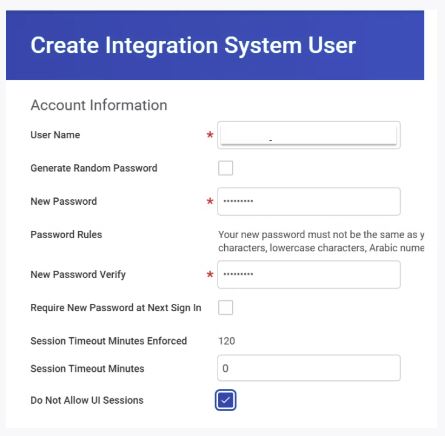
Step Two: Create an Integration System User (ISU)
1. In the Search field, type “Create Integration System User”.
2. Select the Create Integration System User task.
3. Complete the Create Integration System User task by supplying, in the Account Information section, a User Name (we recommend "easyllama") and Password for a new Integration System User. The password can contain numbers, letters and only some special characters ($!#).
4. Check the Do not allow UI sessions box and leave the Session Timeout Minutes with its default value of 0.
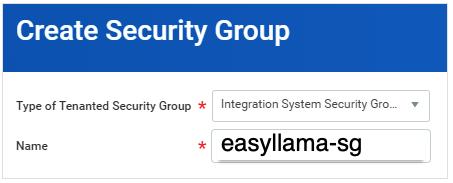
Step Three: Create a Security Group and assign the Security Group to the ISU
1. In the Search field, type “Create Security Group”, and then click Create Security Group task.
2. On the Create Security Group page, from the Type of Tenanted Security Group dropdown menu, select Integration System Security Group (Unconstrained).
3. In the Name field, enter a name: easyllama-sg.
4. After the Security Group successfully created, you will see the Edit Integration System Security Group (Unconstrained) page, where you can assign members to the Security Group.
5. In Group Criteria section, add the new ISU, created in step 2, to the Integration System Users list of this security group.
Step Four: Configuring Domain Security Policy Permissions
List of domains that will be used in this step**:
- Workday Accounts
- Worker Data Public Worker Reports
- Person Data Work Contact Information
- Person Data Home Address
- Worker Data Current Staffing Information
- Worker Data All Positions
- Worker Data Business Title on Worker Profile
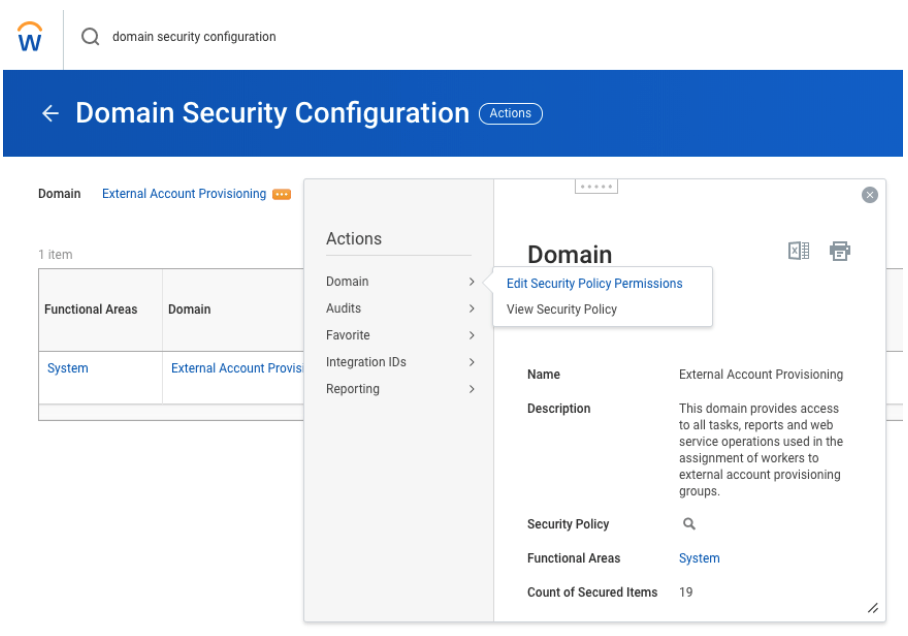
- In the Search field, type and select “Domain Security Configuration”.
- In the Domain field, search the Domain from the table, select the result and select OK.
- Select the 3-dots symbol (...) next to the Domain name and select Actions > Domain > Edit Security Policy Permissions
- On this page, under Integrated Permissions, add the Security Group created in the previous step (
easyllama-sg) and select the checkbox in the Get permission column. - Select OK, then Done on the next screen to complete the configuration.
- Repeat steps 1-5 for all the domains in the list above and for any other domains whose fields you want to import from Workday to EasyLlama.
- If an alert to Activate Pending Security Policy Changes is displayed, do this after all domains have been updated for the security changes to take effect immediately (See Step Five: Activate Security Policy Changes below.)
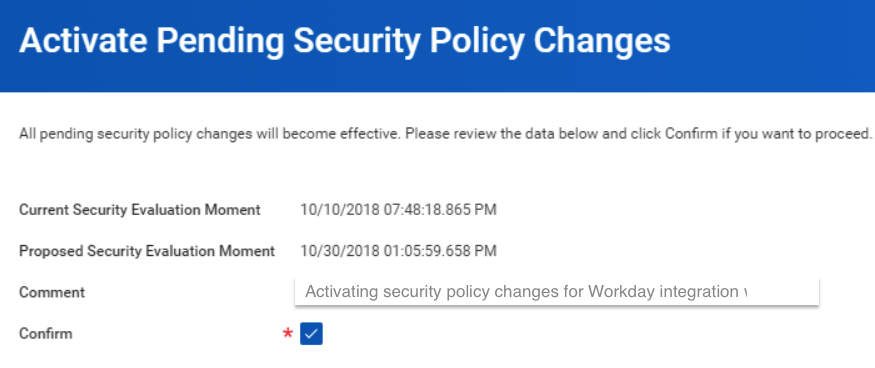
Step Five: Activate Security Policy Changes
- In the Search field, type “Activate Pending Security Policy Changes”, and click that task.
- For auditing purposes, you will be asked to enter a comment. Enter
Activating security policy changes for Workday integration with EasyLlamaand then click OK. - On the next screen, check the Confirm checkbox and click OK.
Step Six: Create Custom Report
- In the Search field, type “Create Custom Report”.
- On the Create Custom Report page, type in the Report Name:
easyllama-report. - Select Report type to be
Advanced. - Mark the Enabled As Web Service check box and Optimized for Performance check box.
- Select as a Data Source:
All Active and Terminated Workers. - Click OK.
- In the Additional Info section, click on Columns.
- Click + to add a column tab. Each column tab is a report field in the custom report. The report should include the information as described below.
- Please enter in the Field and in the Column Heading override JSON Alias columns, the same (JSON) value, for example:
email_address. - Click OK.
Information to include in the report
Fields must have the exact field name as shown here, and are case-sensitive:
- first_name
- last_name
- title
- status (active, inactive, or including the word 'leave' )
All terminated employees should remain in the report for 30 days to ensure they are archived in EasyLlama. Employees removed from the report before being archived will remain in the EasyLlama Dashboard. Please be sure, also, to enable the automation to archive employees when they are terminated. (More here: Automations) - role (supervisor or non-supervisor)
- NOTE: To automatically trigger recertification training for Learners who’s role has changed from supervisor to non-supervisor, please contact Support@EasyLlama.com, and we can enable the setting for you.
- work_location
- work_city
- work_region (state, province)
- work_country (country)
- start_date (optional)
The Start Date format should be YYYY-MM-DD - Ex: March 28, 2021 would be 2021-03-28 - department (optional)
- employee_id (optional)
See notes below for field name options to add a Manager to each Learner's record, which will connect them in the dashboard
Adding Managers to the Report
Adding a Manager to the report will connect your Learner to their Manager in the dashboard. This can allow notifications to be sent to the manager about training completion (Enable under Settings > Training Settings in your dashboard)
Managers must exist in your dashboard as Supervisors to be added. If the manager does not have a Learner record, they will not be added to the Learner's record. There are three field names you can use:
- manager
This will match by the manager's full name. This option is not suggested, as manager names may appear differently in your report - often managers are listed by preferred names or nicknames. For example, if my name is Anthony on my Learner record, but I am listed as Tony when referred to as a manager in the report, nothing will populate. This can also be problematic if there are spaces in the name, misspellings, or special characters. It is better to use one of the other options. - manager_email
Matches by the Manager's email - manager_employee_id
Matches by the manager's employee id
Step Seven: Add an Authorized User
- In the Search field, type “View Custom Report”.
- In the View Custom Report field, enter the name of the created custom report.
- Select the report from the search results and click OK.
- On the report summary screen, click Action > Custom Report > Edit.
- In the Additional Info section, click Share.
- In the Report Definition Sharing Options section, select the Share with specific authorized groups and users option.
- In the Authorized Users field, enter the username of the Integration System User (ISU) that was created on step 2 ("easyllama").
- Click Enter and OK.
Step Eight: Get the Report URL
- In the Search field, type “View custom report”.
- On the View Custom Report page, click My Reports.
- Select the
easyllama-reportreport and click OK. - On the View Custom Report page, click Actions > Web Service > View URLs.
- On the View URLs Web Service page, in the JSON section, right-click JSON, then select Copy URL.
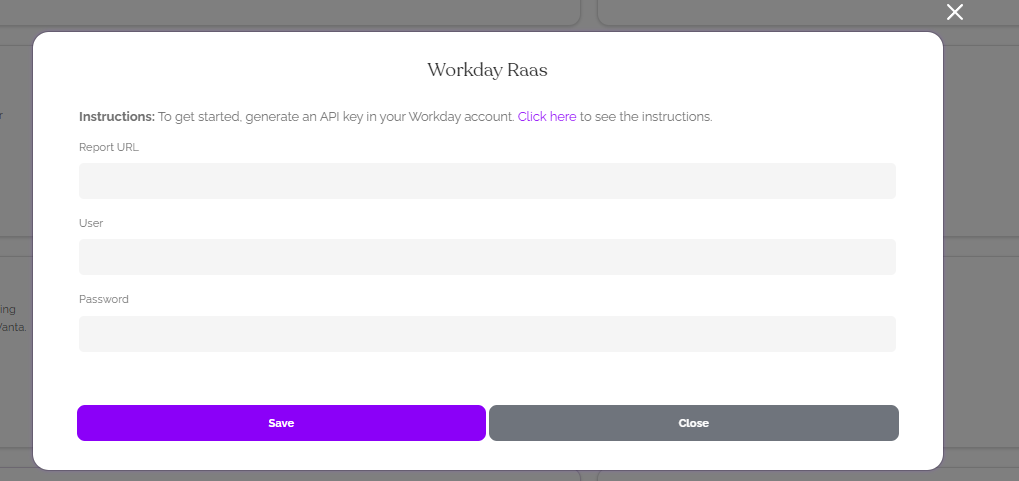
- In your EasyLlama Dashboard, under Settings > Integrations, click "Connect" on the Workday tile and enter the URL you copied to EasyLlama, along with the ISU username/password you created (See Step Two: Create an Integration System User (ISU)).
- Follow the setup flow to complete the connection!
(Optional) Step Nine: Prevent ISU's Password from Expiring
The ISU's password can expire and cause the integration to fail. We recommend taking these steps to make the password permanent.
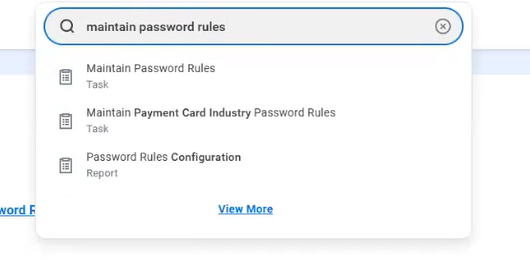
1. In the Search field, type “Maintain Password Rules”.
2. Select the Maintain Password Rules task
3. Scroll to the bottom
4. Find the System Users exempt from password expiration list
5. Enter the ISU from step 2
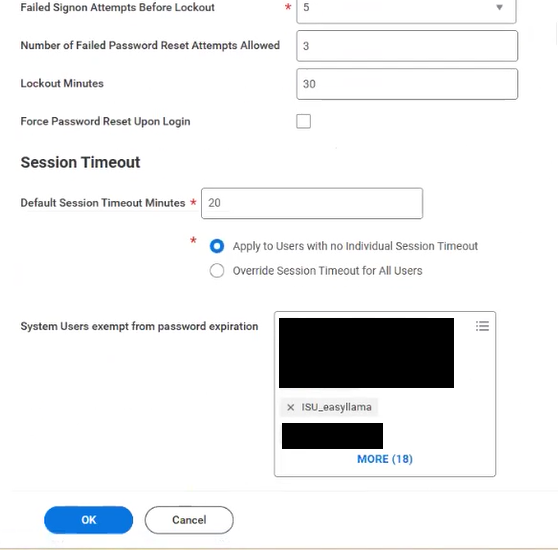
6. Click OK