These guidelines pertain to manual configuration. We highly recommend to use the out-of-box Okta application.
Our SAML 2.0 integration will allow employees from your organization to log in to EasyLlama without using passwords. Our app is available in the Okta marketplace and alternative instructions are provided here. This integration is available for Premium Plan subscribers only.
We support the following roles:
- EasyLlama admin
- EasyLlama learner
Both already need to be present in your EasyLlama account in order to be able to use the SAML 2.0 login.
Supported Features
The Okta/EasyLlama SAML integration currently supports the following features:
- SP-initiated SSO
- IdP-initiated SSO
- JIT (Just-In-Time) Provisioning
For more information on the listed features, visit the Okta Glossary.
Add custom fields to Okta users
- Go to Profile Editor - Go to Directory > "Profile editor" tab in your Okta admin dashboard.
- Select user type - Select the User type to edit. There should be a default Okta user.
- Add the Role attribute - We are going to add new attributes specific to EasyLlama. Add a new attribute to the User profile to differentiate between Admins and Learners. Click on Add attribute button and fill out the attributes based on the images.
- Admin role: will have access to the EasyLlama admin dashboard and will be able to perform all operations such as adding/removing learners or assigning trainings. They will be provisioned during the first Okta login if they are not in EasyLlama yet.
- Learner role: will be able to log in to EasyLlama and access the courses assigned to them by an admin. They will be provisioned during the first Okta login if the "Training Tag" field is filled out.
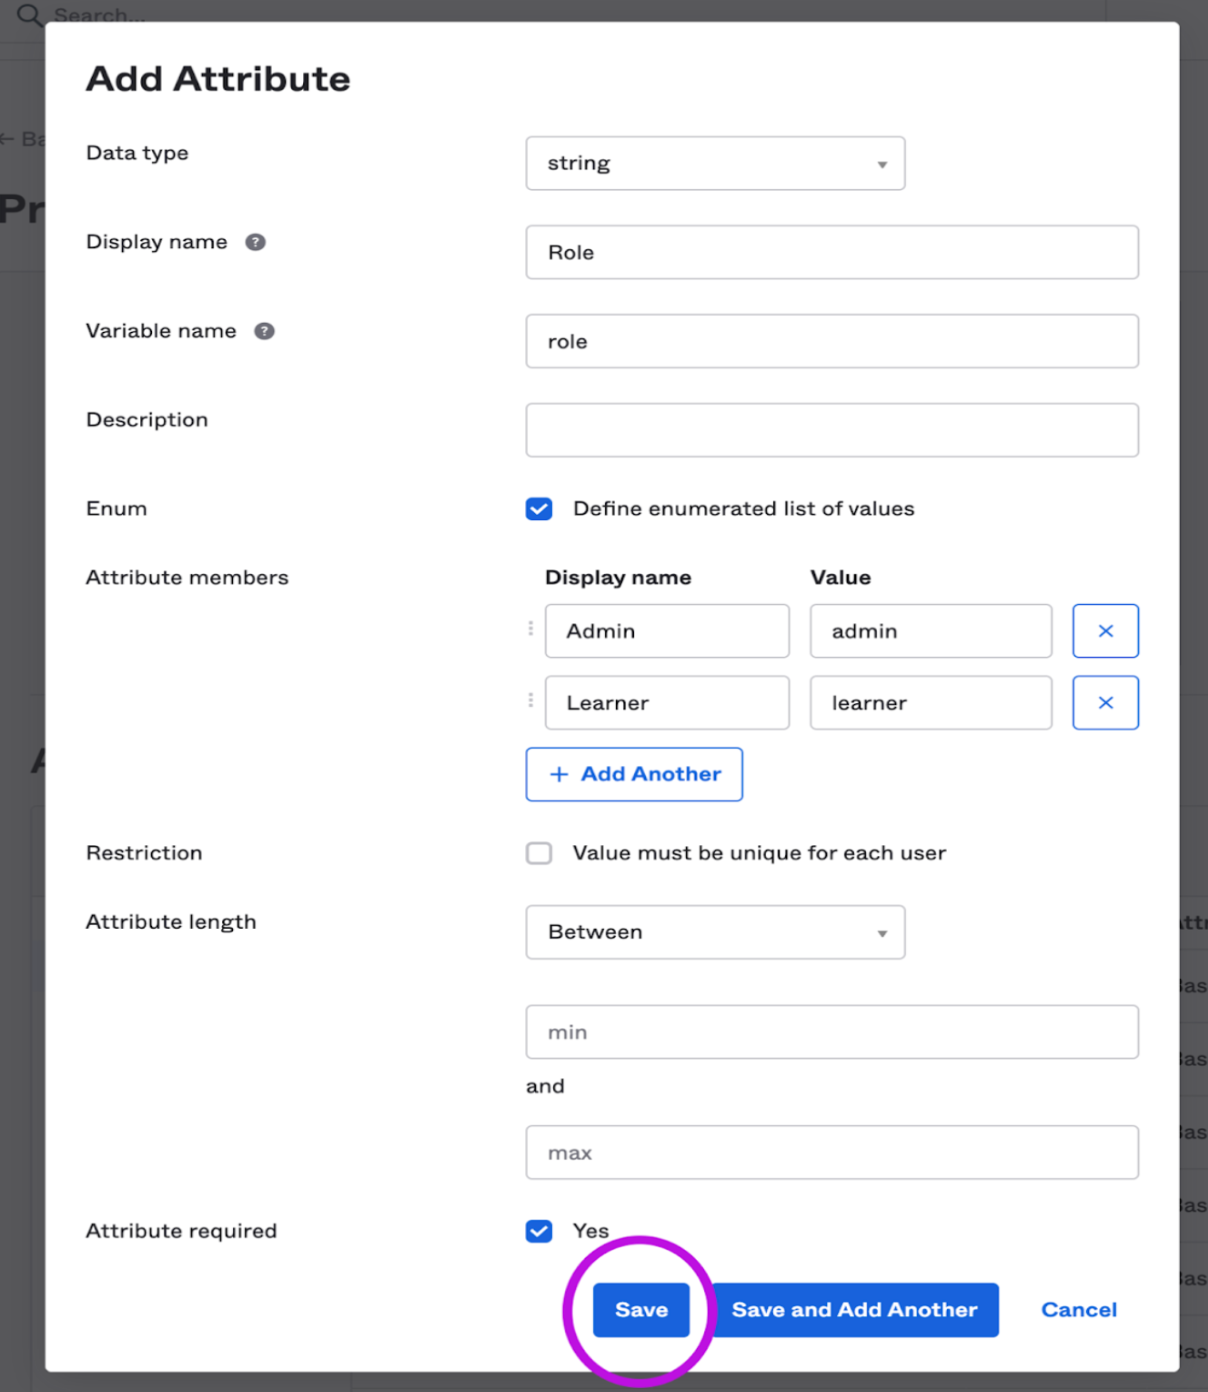
- Add the "Training Tags" attribute (optional) - If you would like to use the "Learner" role, you will need to add the "Training Tags" attribute so that you can assign trainings to them during provisioning. The value should be training_tags
Here is how custom fields should appear:

Set up a new Okta app
- Install the EasyLlama Okta app
- Verify the settings:
In this step, you will set up the SAML 2.0 settings between Okta and EasyLlama. Please copy the settings from below:
General
- Single sign-on URL: https://dashboard.easyllama.com/users/saml/callback
- Audience URI (SP Entity ID): https://dashboard.easyllama.com/users/saml/callback
- Name ID format: EmailAddress
- Application username: Email
- Update application username on: Create and update
- Response: Signed
- Assertion signature: Signed
- Signature algorithm: RSA-SHA256
- Digest algorithm: SHA256
- Assertion encryption: unencrypted
- Assertion inline hook: None (disabled)
- Authentication context class: PasswordProtectedTransport
- Honor force authentication: Yes
- SAML issuer ID: keep the same value - http://www.okta.com/${org.externalKey}
Attribute Statements
Add the following statements at the bottom:
First name:
- Name: first_name
- Name format: unspecified
- Value: user.first_name
Last name:
- Name: last_name
- Name format: unspecified
- Value: user.last_name
Role:
- Name: role
- Name format: unspecified
- Value: user.role
Training Tags (optional):
- Name: training_tags
- Name format: unspecified
- Value: user.training_tags
Department (optional):
- Name: department
- Name format: unspecified
- Value: user.department
Title (optional):
- Name: title
- Name format: unspecified
- Value: user.title
Manager email (optional):
- Name: manager_email
- Name format: unspecified
- Value: [manager's email value in Okta]
Click Next
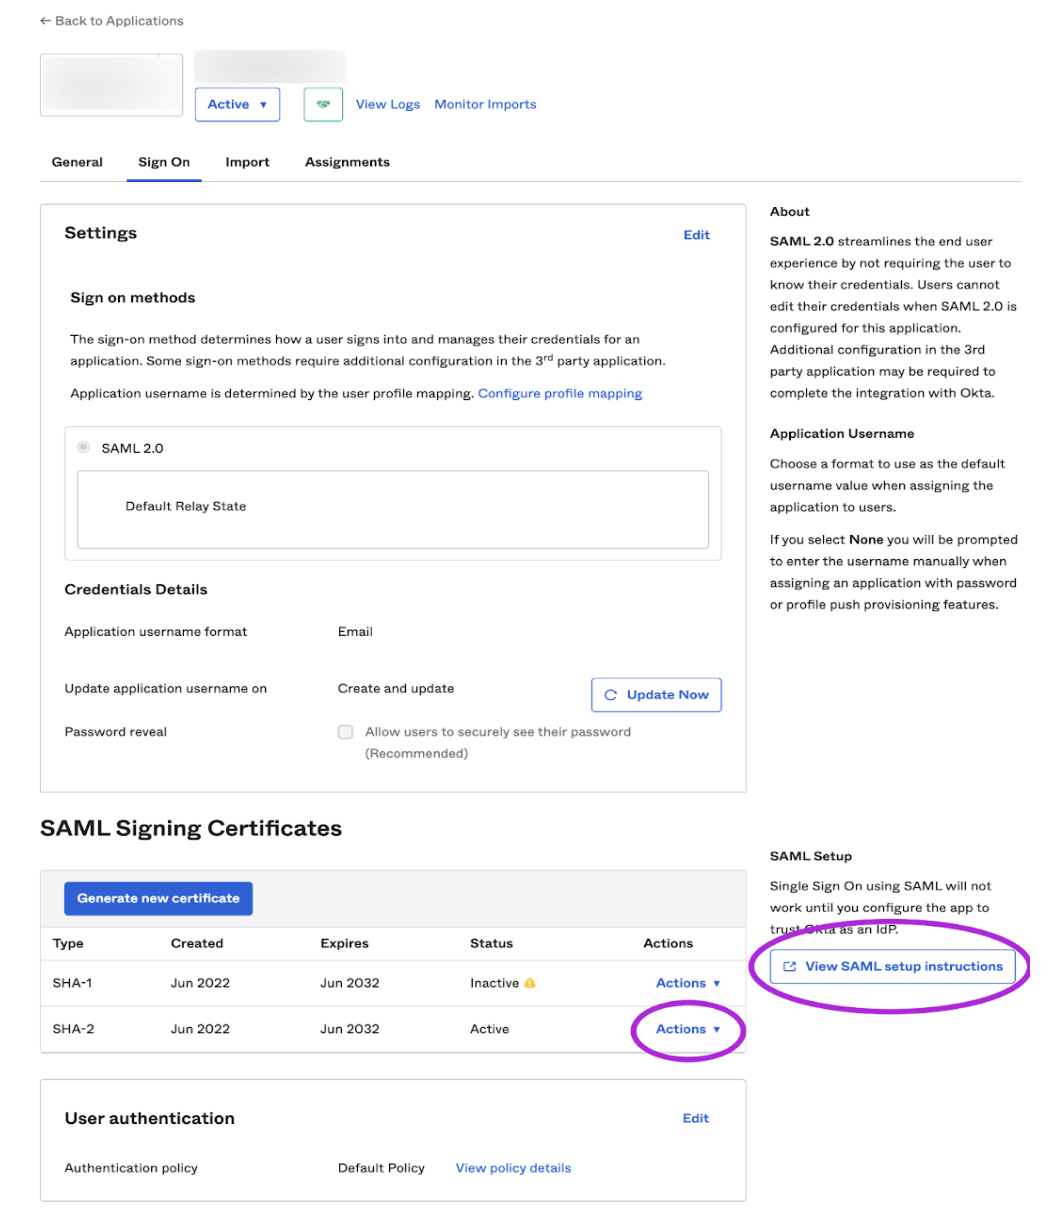
- Download the certificates from Okta - Download the certificates from Okta and keep them secure. These will be uploaded on the EasyLlama dashboard. Clicking the View SAML setup instructions will take you to the SAML instructions page which you will need to copy into your EasyLlama dashboard.
Add the SAML settings in EasyLlama
- Add the SAML settings to your EasyLlama dashboard - Go to your EasyLlama dashboard and click Settings > Authentication > SAML Authentication Settings
Enter the following items:
- Single Sign On URL: the URL generated by Okta, e.g. https://company.okta.com/app/org/xxx/sso/saml
- Identity Provider Issuer: the URL generated by Okta, e.g. http://www.okta.com/xxx
- X.509 certificate: the certificate generated by Okta (.cert file)
- (Optional) Enable "Provision users automatically when they sign in". This will create the account in EasyLlama if a user does not already exist. Note, this is not recommended when using SCIM Provisioning, or any integration that already creates users, as having both can cause issues with user creation.
- Once you have entered all the required fields, click Save.
- Upload the EasyLlama logout certificates back to Okta (optional)
Once your settings are all saved, EasyLlama will generate two certificates. You will need to upload the SLO certificate back to Okta (under logout signature certificate) so that it can be used to log out.
Congratulations, your SAML integration is now ready to be used!
Test your SAML login
- Log in with Okta: Go back to your Okta account. Find your user and assign the "Admin" role. Click on the EasyLlama tile. You should be redirected to your EasyLlama dashboard.
Notes
The following SAML attributes are supported:|
Name |
Value |
|
first_name |
user.firstName |
|
last_name |
user.lastName |
|
userType |
user.userType |
|
training_tags |
user.training_tags |
SP-initiated SSO
You can get the SP-initiated link from the SAML Authentication Settings > Copy SAML in Okta.